PUTTING A FLAG ON MY BIKE - Written by Darren Siow
After some outings with Tai Woon and the LCSG team, I thought it was fun to have a flag on my bike. Initially, I wanted one just for fun. Later on, I felt it was a good safety measure. It’s strange that I would consider putting a flag on my bike because for many years I rode road bikes and there was no way in hell one of those flappy things were going on my bike. Maybe it’s age, or maybe it’s knowing that bad things do happen to cyclists on the road, so I decided that I wanted aflag. Come to think of it, I have a flag on my Brompton but I never put one on my road bike. I don’t know why I have double standards.
The Rod
Anyway, I thought for a long time about how to make a flag that would fit my Brompton. On one of my rides to Changi Village, I decided to pop into the shop that sells fishing equipment. My hope was that I would be able to buy a cheap fishing rod to use as the flagpole. I knew there were telescopic fishing rods but they usually also come with the loops for the line. I told the shop owner that I wanted a telescopic rod without the loops and to my surprise, he said he had exactly what I needed. And he was right! From under the counter, he brought out a few carbon fiber prawning rods! It wasn’t cheap but it suited my needs to a T. The fully collapsed length is about 30cm; the extended length is 7 feet! The nice thing about the prawning rod is that you can customize the length you need. Since the sections of the rod collapse into each other, you can simply remove the smallest few or the largest few sections to get the length you need.
The Flag
My initial attempt to get a flag was to go online and buy one. However, they aren’t cheap. So as a keen DIY-er, I decided to make one myself. Digging into my wardrobe, I found the perfect t-shirt to be used. It was an old Nautica tee which I never wore anymore because it was too rough. The color was perfect!
I had 2 concepts to fit the flag onto the rod: glue it down or slide it in. I’ve done both and there are pros and cons for both concepts. The glued down flag is very secure, and you won’t have to worry about the flag flying off the rod. The downside is that it takes up a fixed length of the rod, so you can’t collapse the rod fully. Obviously, for the slide in concept, the pros and cons are opposite. For my current flag, I’ve taken a lazy man’s approach to solve the flying off issue: zip tie! It’s proving to be very effective; I’ve ridden over a hundred klicks and it’s staying on the rod just fine.
My first proto flag had a standard pennant style, whereby the side that is fixed to the rod is shorter than the other 2 sides. However, due to the softness of the material, I realized that I had to ride really fast before the flag was fully extended. That called for Plan B. In the next prototype, I followed a design from Purple Sky Flags (http://www.purpleskyflags.com/) because I like how their flags look. The current flag orientation is oblique to the first prototype. This meant that the longest side of the flag was fixed to the rod and the shortest side was the lowest edge (nearest to the ground). In this design, the weight or softness of the material is negligible because the distance to fully extend the flag is very short. In the next few pictures, you will see the items that I’ve used as well as the current flag that I’ve placed on my Brompton.
 |
| The Sacrificial T-shirt |
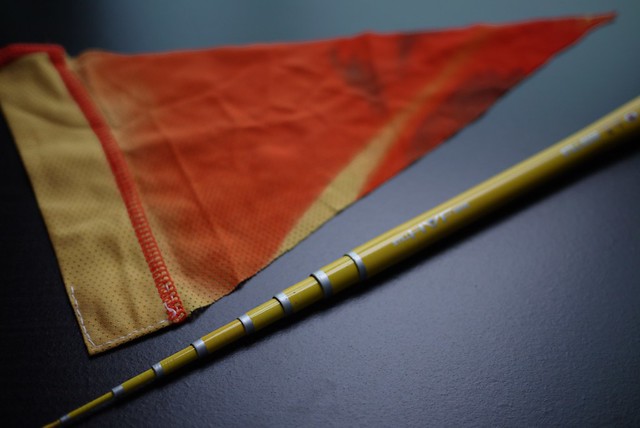 |
The First Flag Proto and The Telescopic Prawning Rod |
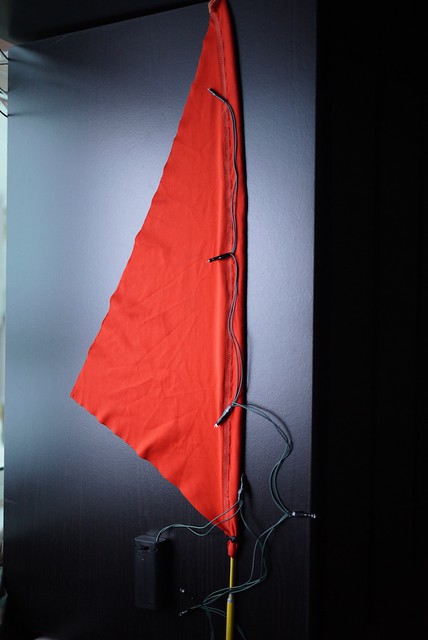 |
| Mark 2.. with blinking lights |
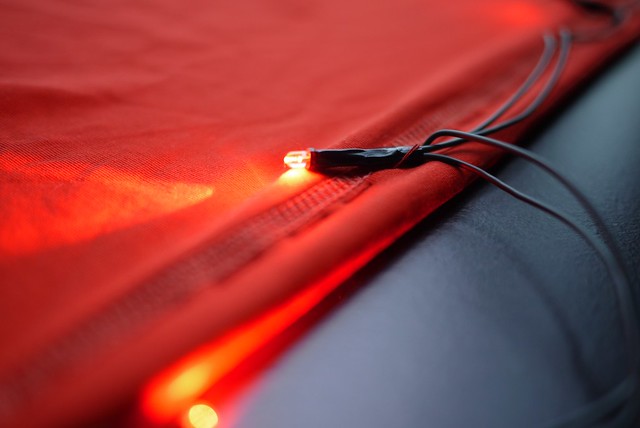 |
| Stitching to hold the snaky blinking lights |
 |
| Taiwoon recycled kite pole |
 |
| TW flag on his Moulton |


